The Hanukkah Coffee Box was made using Hugo, a static site generator. This means it creates static code you then deploy to the web. There is no server-side execution part of the code base. This is fine if you want to show content, but if you want to interact with the visitor to your site and collect feedback on a great coffee box, you will need to do something a little creative.
Assumptions: You know a little bit about web development and are familiar with the basic concepts of a static website. You have a static site and want to collect data or do something else interactive with your web experience. For some reason, you don’t want to create a whole new interactive web experience; you want to add a component to a static site.
If you enjoy watching videos instead of reading (not me; I want this written down), you can view a Digital Ocean Developer Advocate tutorial here.
The Plan
Hopefully, this is going to be a multi-part series of posts.
My plan is pretty simple:
|
|
I’m choosing to go this route for several reasons:
- Learning to work with Serverless is Fun.
- Cost-wise, setting up a Serverless Function should be more cost-effective.
- It should be reusable for other future static web pages I build.
There are several cons:
- Databases aren’t serverless, so you have to pay for the database server.
- Security is a concern. You are effectively opening up a path for people to put data in your database.
- This is not a super common approach to serverless usage.
I’m using Digital Ocean for infrastructure. While there are other serverless services, I like the ecosystem behind Digital Ocean, and I’ve used it before.
Step 1: Database
The first step is creating your database. I’m using Postgres. There is no good reason for this, but once you log into Digital Ocean, click the Databases tab on the left side and create a database.
You will have to pick a region and configuration. At the time of this writing, the total cost is about 15 USD a month.
Accessing the Database
Once you create your database, you can select it in the Databases section, and it will display connection information.
Security Note: When creating a database, it is generally open to anyone with Internet access.
To secure the database, go to the “Trusted Sources” section of the page and add sources you can connect to. Depending on your service provider, this can be easy or hard.
You can go to What’s My IP to find your IP address and add it to the list of trusted sources. The problem is that some service providers, like mine (COX), do not give you an IPv4 address; currently, DO doesn’t support an IPv6 address. To get around this, you can set up your own VPN on Digital Ocean, which is another cost and another server but now gives a much more secure way to access your data. I did this and will write about how to do it. It’s not too hard.
Creating a Table
Next, create a table. You can do this in SQL or with a tool. I use Postico 2 to connect. Then, make a table like test_table.
Step 2a: The Insecure Way
If you are trying to get things up and running, there is a quick and dirty way to access your database. The fastest way I’ve found is to create a DO function and open the database system to public connections.
This approach involves removing trusted sources from your database and using the connection information to create the connection.
Next, you need to create a DO function. You can do so manually by building the structure or using the command line tools from Digital Ocean:
https://docs.digitalocean.com/products/functions/how-to/create-functions/ Specifically:
|
|
This example is in JavaScript, which is what I chose, but DO Functions supports many languages.
Next, you will want to configure your functions environment. Specifically, you want to provide connection details like host, port, username, password, and database.
You can define these in the project.yml file in your function bundle. If you run JavaScript, you can add dependencies like Postgres in a package.json file at the same level as your source file.
My Source file is super simple and looks something like this:
|
|
Then you can deploy this function to Digital Ocean using the CLI:
|
|
You can then run it through your CLI or the web interface. If you want to pass values, you can get the URL and add it to Postman or Bruno.
This isn’t super safe because anyone can connect to your database; all that is required is a username and password.
Step 2b: The Safer Way
This approach requires slightly more work but is preferred and more secure. Instead of using raw functions, we will create an app using the Digital Oceans App Platform and give the app permission to access the database.
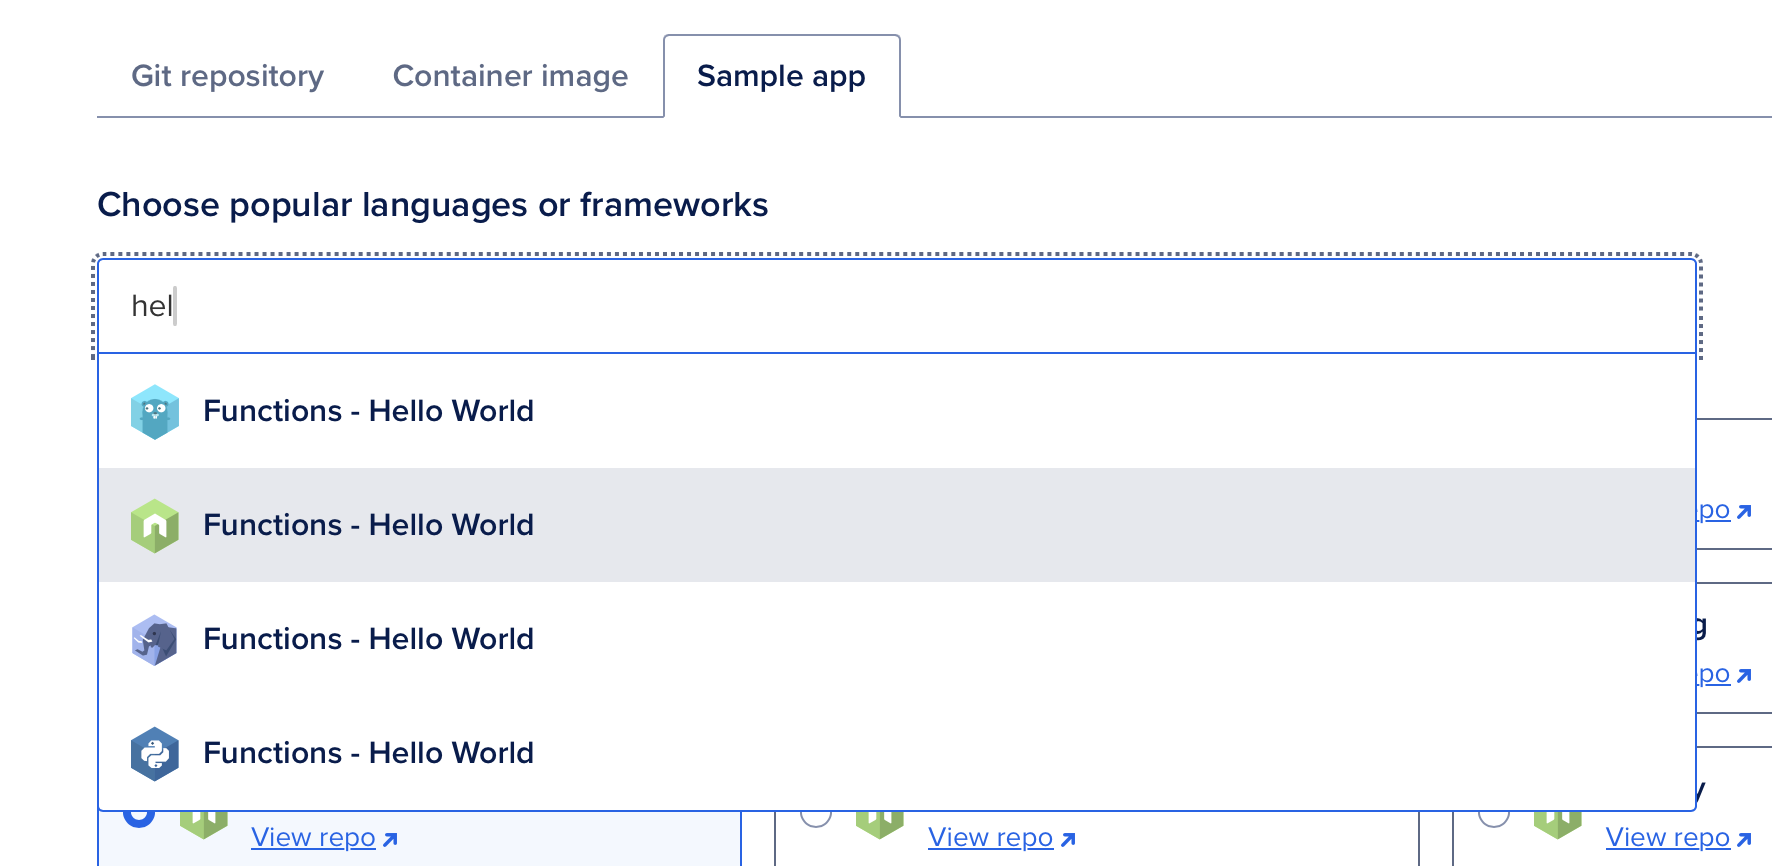
You can start by going to the App Platform Section on your Digital Ocean Dashboard and clicking the Create button at the top of the section.
If you are like me and don’t already have a repository set up, you can use a Sample App as a good starting point. In the search box of the Sample App start typing “hel” and you will see options for “Functions - Hello World” in a bunch of different languages. Pick the one you want.
I used the “Create New Repository” option, so I was taken to Github to create the repository. After the repo is created, it is deployed. Next you need to connect your database to the App. Go to App page by clicking on App Platform and selecting your App from the list. At the top of the page, there there is an “Add resources” dropdown. Click it and select “Create or attach database.” Notice there is an option for a dev database. I didn’t see this when I created my project, so I already have a production database. I just connected it.
You can clone it to your machine and edit the project.yaml file to include the environment values you need, modify the package.json file to include your dependencies for the database connection, and modify your source. An example is above in Step 2a if you want to do this.
Once you commit and push your changes to your repository, Digital Ocean automatically pulls in the code and redeploys. You can run the function from the Apps or using other tools, the same way I mentioned above.
End of Part 1
That is the end of Part 1. There are a bunch of things still to do. Next up is designing the actual database table I want to use to collect form data, creating a function to input the data into the table. Sanitizing the data to make sure it is safe to input. Then there is the aspect of connecting it to a web form securing the route to prevent bad actors.
Hope you enjoyed this. Let me know if you have questions.